
Tags
ann lindsay, deciduous tree, Fall, foliage, omega, pine tree, rigger, tree, Watercolor
Bob Ross has been prominent lately in my blog posts (as a kid I spent hours in my grandparents’ TV room glued to the TV watching him do his magic). And it’s to his happy little trees that I turn in this post.
In my recent Ann Lindsay watercolor workshop at Omega, Ann taught us several techniques for adding trees to a landscape painting. This was a high pay-off lesson — each method was easy to learn, and what emerged actually looked like trees.
Two special tools were used (other than my standard 10 round brush): A rigger brush and a stick whittled to a point. Quick note about the origin of the rigger: it’s called a rigger, because it was used to paint the rigging of ships. Cool, eh? And a quick note about the origin of the stick: Ann whittled it.

Standard (Monochromatic) Deciduous Tree. We started with your standard deciduous tree. I mixed a dark mix for the trunk and branches (ultramarine blue and burnt umber and a little sap green). Using the rigger, I painted from the ground up, moving the rigger in small jerky movements to keep the branches looking like branches and not boomerangs or strings of spaghetti. It’s very important to start from the ground (in the case of the trunk) and from the trunk (in the case of the branches). Doing so ensures that your stroke ends thin at the end of the branch.
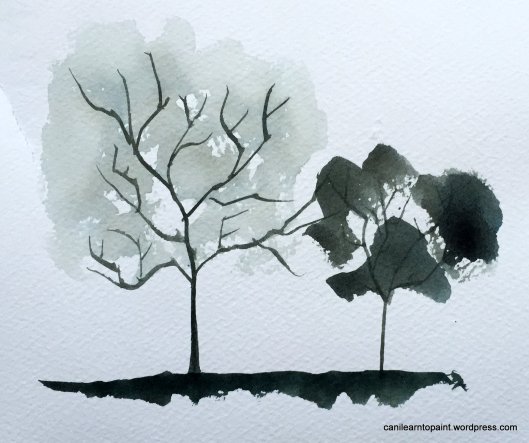
The tree on the left is a winter tree. The very light wash hints at twigs stripped of their leaves. The tree on the right is a summer or spring tree with leaves. When painting foliage, I learned that you need to leave “sky holes” where the sky shows through. The temptation is to overdo it and paint one big foliage blob. No one likes a foliage blob.
Pine Trees. For these pine trees I used a 10 round brush. I first painted a straight line down (from top to bottom) for the trunk. Then, starting at the top of each tree with the tip of the brush, I loosely painted back and forth to the bottom of the tree, making sure to vary my hand placement as I painted in order to get non-uniform shapes. I tried to do each tree in one pass, having to fight the urge to go back and fiddle with each tree.

To get the white lines of the trunk, I used credit card (given to us by Ann) that had been cut to have some sharp edges (a hotel key card could work, too). I waited until the paint was damp, and then scraped in the white lines.
Scraggly Pine Tree. For the scraggly pine tree (scragglius pinus) I used the whittled stick (stickus whittlius) and a squirt bottle of water (agua squirticus). I first soaked the stick in water, and then I loaded it with paint. I started at the top and scratched back and forth (just like a good back scratch). While the paint was still wet, I squirted water onto the paint, which had the effect of, well… I’m not exactly sure what effect it had, but here it is:

Fall Foliage. The fall foliage trees were created in the same way as the earlier-described deciduous trees (because these are, in fact, deciduous, too). I pre-mixed some fall colors and enjoyed watching them mix together as I painted each tree.

Forest. The forest was created in two steps. Step one was to wet the paper, and when it was still damp, I painted in some pine trees using the method described above. Because the paper was wet, these pine trees blurred, creating the hazy background effect. After that had dried, I painted in the foreground pine trees. And voila: insta-forest! 
I can see why Bob Ross called his trees happy. It really did make me happy to paint all of these little tree studies. And by getting good at this technique, I was able to add trees to larger landscape paintings with much more confidence.

Wonderful!! Not only have you convinced me that I need to take Anne’s course on landscapes but you have given very clear instructions for me to practice!! Thanks David – I love your trees!!
LikeLike
Thanks for stopping by, Barbara! Yes, her landscaping class was really great. She does a class on painting water/ocean, too, which I might try to attend next year. It’d be great if we could be painting partners in her class again!
LikeLike
Pingback: A Mountain Study – Part 1 | canilearntopaint
Pingback: The Wentworth | canilearntopaint